{Pin It}
With a lot of us not being able to travel – it’s the perfect time to perfect our photography!
As a Mom, traveler, and blogger; I am constantly trying to learn the art of photography. One thing I’ve learned over the years is that shooting on manual will create the best images, but requires a bit of skill to get that perfect shot. I worked with Jennifer Carr to help take my photography to the next level. She was patient with my extreme lack of knowledge and when my camera battery died just as we started the lesson *blush*. She taught me a ton of tips that I put to use during our summer trip to France. My husband even commented on how much better my photo’s looked!
I asked Jennifer to share some basic tips to help you get off auto and start taking control of your camera.
The Basics of Exposure
Exposure is the single most important aspect of photography. It is defined as the amount of light that falls onto your digital camera’s sensor when capturing an image. Too much light and your image looks white. Too little light and your image looks dark. The goal of learning exposure is like to get just the right amount of light into your camera.
There are three factors that determine how much light enters your camera. ISO (pronounced I-S-O, not eye-so), Shutter Speed, and Aperture.
ISO
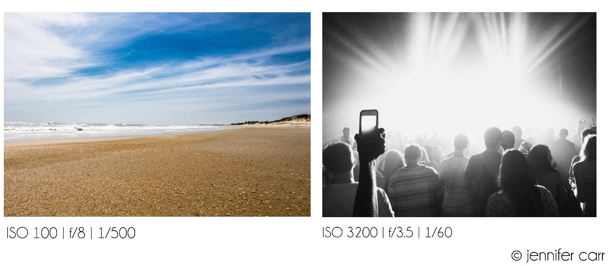
ISO determines your camera’s sensitivity to light. If your scene has a lot of light (think at the beach at noon on a sunny day), you will use a low ISO number. If you are shooting indoors or in darker settings, you will use a high ISO. The downside of using a high ISO is that the picture quality decreases. The higher the ISO, the more noise or grain the image contains. In the above images, the image of the beach is crystal clear, the only grain is in the sand. The image of the right has lots of grain and demonstrates that noise doesn’t have to be a bad thing, if you use it properly.
Shutter Speed
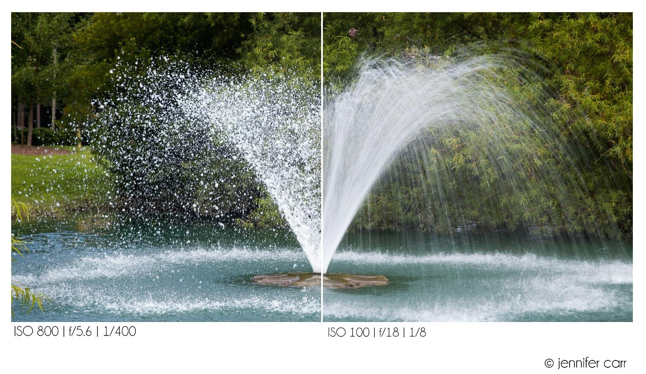
Shutter Speed is the amount of time that your camera’s shutter is open. It is measured in fractions of a second. As shown in the above images, leaving the shutter open for a short amount of time freezes motion while letting the shutter stay open for a longer amount of time blurs motion. Long shutter speeds can offer a lot of creative value to a photograph, but they do require either an extremely steady hand or a tripod.
Aperture
Aperture means opening. Of the three topics discussed today, it is the only one controlled by the lens, not the camera. Aperture is measured in stops called f-stops. Aperture can get a little confusing and takes some time to understand.
When discussing aperture, think of it like your eye. Open your eye just a sliver, and only a small amount of light comes in. Open your eye all the way and lots of light enters. Simple enough, right? Here’s where it gets tricky. Aperture numbers are opposite amounts of light. A small aperture number (f2.8) = a big opening = more light. A large aperture number (f16) = a small opening = less light. Look at the diagram above, read it multiple times, even draw one of your own. You’ll get it. I promise!
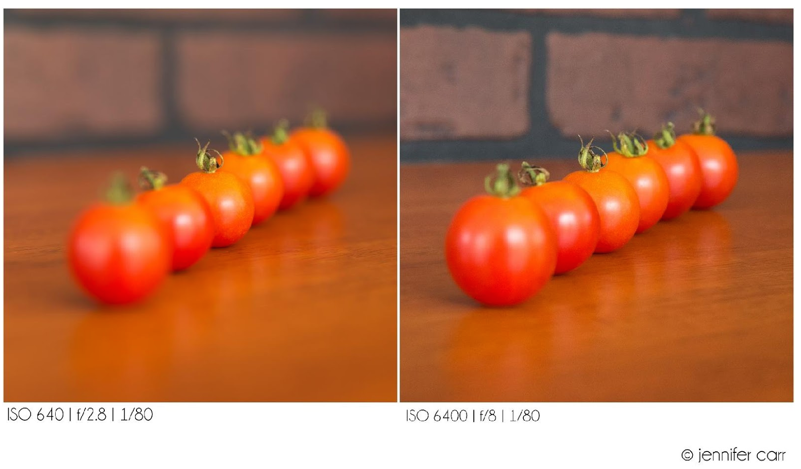
Creatively, aperture determines Depth of Field (DOF). Depth of Field is that beautiful blurry background is so many photographs. As shown with the tomatoes above, a small aperture number (f2.8) allowed for a very shallow depth of field. A larger aperture number (f8) allowed for a wide depth of field.
Hopefully now you understand the three basic components of exposure. Next time we’ll learn how they work together to create the perfect image.
Jennifer Carr is a natural light Fine Art and Portrait Photographer in Virginia Beach, VA specializing in recording real life, real moments, and real memories. Visit www.jennifercarrphotography.


Leave a Reply